组件封装 2 自定义组件
本文总结一下自定义一个组件的过程。以 React + Sass 封装 Button 按钮为例。
过程基本为定义颜色变量,理清功能需求,样式封装等。
基础配置
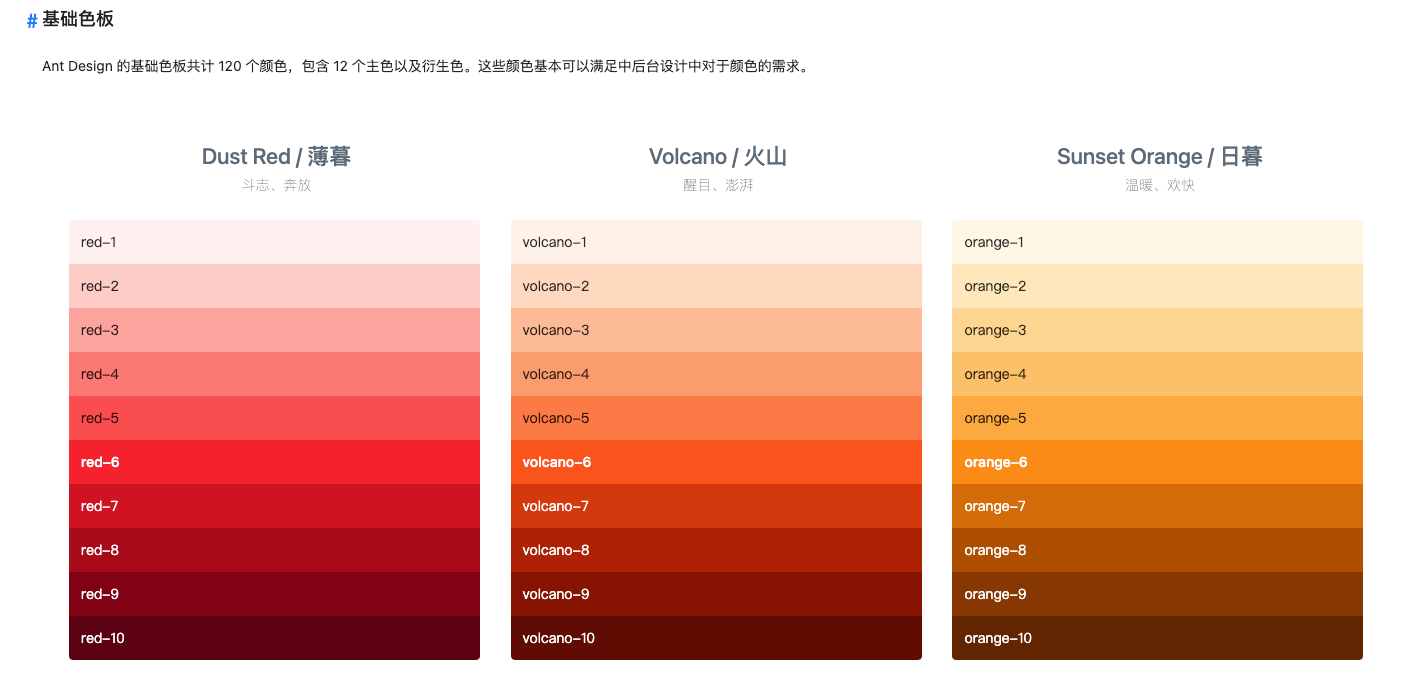
首先全局自定义颜色,类似于 antDesign UI 组件库一样,需要有基础色、品牌色和功能色三种。
为了在全局通用,因此选择 sass 的变量形式先将各色系记录下来。

字体设置,一个是字体类型和等宽字体:
$font-family-sans-serif: -apple-system, BlinkMacSystemFont, 'Segoe UI', Roboto,
  'Helvetica Neue', Arial, 'Noto Sans', sans-serif, 'Apple Color Emoji',
  'Segoe UI Emoji', 'Segoe UI Symbol', 'Noto Color Emoji' !default;
$font-family-monospace: SFMono-Regular, Menlo, Monaco, Consolas,
  'Liberation Mono', 'Courier New', monospace !default;
$font-family-base: $font-family-sans-serif !default;
功能梳理
仿照 andDesign 设计 4 种按钮(未添加虚线按钮):
- 主按钮:用于主行动点,一个操作区域只能有一个主按钮。
- 默认按钮:用于没有主次之分的一组行动点。
- 虚线按钮:常用于添加操作。
- 文本按钮:用于最次级的行动点。
- 链接按钮:一般用于链接,即导航至某位置。
字体大小: 基础、大号和小号三种。
还有是否禁用,这三种类别。
功能实现
先看一个普通的按钮使用:
<Button btnType="link" size="sm" href="https://www.baidu.com" target="_blank">
  link
</Button>
因此我们可以定义出按钮的 props 属性:
type ButtonSize = 'lg' | 'sm'
type ButtonType = 'primary' | 'default' | 'danger' | 'link'

interface BaseButtonProps {
  children: React.ReactNode
  className?: string
  disable?: boolean
  size?: ButtonSize
  btnType?: ButtonType
  href?: string
}
但是这还不够,因为按钮还有会自己的其它属性如 onClick 等点击事件,为此,还需要对这个进行改造:
import { ButtonHTMLAttributes, AnchorHTMLAttributes } from 'react'

// 获取原生按钮事件的 attributes
type NativeButtonProps = BaseButtonProps & ButtonHTMLAttributes<HTMLElement>
type AnchorButtonProps = BaseButtonProps & AnchorHTMLAttributes<HTMLElement>

// `Partial<Type>`返回一个新类型,将参数类型`Type`的所有属性变为可选属性。
type ButtonProps = Partial<NativeButtonProps & AnchorButtonProps>
此时的 ButtonProps 才是符合预期要求的。
按钮功能的实现:
import { FC, ButtonHTMLAttributes, AnchorHTMLAttributes } from 'react'
import classNames from 'classnames'

export type ButtonType = 'primary' | 'default' | 'danger' | 'link'
export type ButtonSize = 'lg' | 'sm'

interface BaseButtonProps {
  children: React.ReactNode
  className?: string
  disable?: boolean
  size?: ButtonSize
  btnType?: ButtonType
  href?: string
}

/** 按钮组件 */
export const Button: FC<ButtonProps> = (props) => {
  const { btnType, className, disabled, size, children, href, ...restProps } =
    props

  const classes = classNames('btn', className, {
    [`btn-${btnType}`]: btnType,
    [`btn-${size}`]: size,
    disabled: btnType === 'link' && disabled,
  })

  if (btnType === 'link' && href) {
    return (
      <a className={classes} href={href} {...restProps}>
        {children}
      </a>
    )
  } else {
    return (
      <button className={classes} disabled={disabled} {...restProps}>
        {children}
      </button>
    )
  }
  return <div>这是一个 button</div>
}

Button.defaultProps = {
  disabled: false,
  btnType: 'default',
}

export default Button
这里还引入了 classNames 做 class 类的管理,以区分不同的按钮样式。主要为按钮类型、按钮大小和是否可用三种。
颜色模块
由于有不同的按钮类型,这里对颜色的封装采用了 sass 的 @mixin 和 @include 对样式进行封装。下面简单介绍一下这俩个的用法:
在 Sass 中,@mixin 是一种可以定义并重用一组样式规则的方式,而 @include 则是将定义好的 Mixin 引入到 CSS 规则中的方法。
@mixin允许定义一组样式规则,然后在需要的地方通过@include引入这些规则。@mixin可以包含任意的 CSS 规则,也可以接受参数,以便在不同的地方使用不同的样式。@mixin使用@mixin关键字定义,例如:@mixin button($color, $background) { color: $color; background-color: $background; padding: 10px 20px; border: none; border-radius: 5px; }@include是将@mixin引入到 CSS 规则中的方式。通过@include关键字,可以在需要的地方引入@mixin,从而将其包含的样式规则应用到当前规则中。@include的语法是@include后跟@mixin的名称和参数(如果有的话),例如:.primary-button { @include button(blue, white); } .secondary-button { @include button(red, white); }
在编译为 CSS 后,以上代码会展开为:
.primary-button {
  color: blue;
  background-color: white;
  padding: 10px 20px;
  border: none;
  border-radius: 5px;
}

.secondary-button {
  color: red;
  background-color: white;
  padding: 10px 20px;
  border: none;
  border-radius: 5px;
}
通过 @mixin 和 @include ,可以避免重复书写相似的样式规则,提高代码的可维护性和可重用性。
因此在组件封装中我们定义俩个 Button 的 mixin:
@mixin button-size($padding-y, $padding-x, $font-size, $border-raduis) {
  padding: $padding-y $padding-x;
  font-size: $font-size;
  border-radius: $border-raduis;
}

@mixin button-style(
  $background,
  $border,
  $color,
  $hover-background: lighten($background, 7.5%),
  $hover-border: lighten($border, 10%),
  $hover-color: $color
) {
  color: $color;
  background: $background;
  border-color: $border;

  &:hover {
    color: $hover-color;
    background: $hover-background;
    border-color: $hover-border;
  }

  &:focus,
  &.focus {
    color: $hover-color;
    background: $hover-background;
    border-color: $hover-border;
  }

  &:disabled,
  &.disabled {
    color: $color;
    background: $background;
    border-color: $border;
  }
}
而后在组件中统一使用:
.btn {
  position: relative;
  display: inline-block;
  font-weight: $btn-font-weight;
  line-height: $btn-line-height;
  color: $body-color;
  white-space: nowrap;
  text-align: center;
  vertical-align: middle;
  background-image: none;
  border: $btn-border-width solid transparent;
  @include button-size(
    $btn-padding-y,
    $btn-padding-x,
    $btn-font-size,
    $border-radius
  );
  box-shadow: $btn-box-shadow;
  cursor: pointer;
  transition: $btn-transition;

  &.disabled,
  &[disabled] {
    cursor: not-allowed;
    opacity: $btn-disabled-opacity;
    box-shadow: none;
    > * {
      pointer-events: none;
    }
  }
}

.btn-lg {
  @include button-size(
    $btn-padding-y-lg,
    $btn-padding-x-lg,
    $btn-font-size-lg,
    $btn-border-radius-lg
  );
}
.btn-sm {
  @include button-size(
    $btn-padding-y-sm,
    $btn-padding-x-sm,
    $btn-font-size-sm,
    $btn-border-radius-sm
  );
}

.btn-primary {
  @include button-style($primary, $primary, $white);
}
.btn-danger {
  @include button-style($danger, $danger, $white);
}

.btn-default {
  @include button-style(
    $white,
    $gray-400,
    $body-color,
    $white,
    $primary,
    $primary
  );
}

.btn-link {
  font-weight: $font-weight-normal;
  color: $btn-link-color;
  text-decoration: $link-decoration;
  box-shadow: none;
  &:hover {
    color: $btn-link-hover-color;
    text-decoration: $link-hover-decoration;
  }
  &:focus,
  &.focus {
    text-decoration: $link-hover-decoration;
    box-shadow: none;
  }
  &:disabled,
  &.disabled {
    color: $btn-link-disabled-color;
    pointer-events: none;
  }
}
至于 sass 中的一些颜色和大小的变量,则可依据需要自由定义。
